Why hike the southern portion of the Arizona Trail?
The southern portion of the trail, the 340 miles from the Mexican border to Lake Roosevelt, is challenging, but in my opinion it is the most interesting part of the trail outside of the Grand Canyon. The north half has the Grand Canyon, of course, but much of the north part of the trail is relatively flat hiking through Douglas Fir forests or flat, exposed ranchlands. In contrast, on the southern part of the trail you sample the classic desert areas (prickly pear, cholla, Saguaro cacti), the mid-level grasslands, and the “Sky Islands”. The latter are the three high peaks (Miller Peak, Mica Mountain, Mount Lemmon) that have pine forests at the higher elevations. You also hike through the Superstition Mountains, which have some beautiful areas. I only had 5 weeks time off, and 340 miles was done in about 25 hiking days.
The southern 180 miles are also proximal to Tucson, so it is relatively easy to hitch or take an Uber/Lyft into town if you need supplies or want to take a day off from hiking.
And you can begin around March 1, which is about the earliest you can start a long trail in the U.S. (other than the Florida Trail). It thus serves as a training hike for some people who go on to hike other trails.
However, the Arizona Trail itself has scenery to match any other trail, and much of this scenery is "exotic" in the sense of being much different than on most other trails. It is definitely worth considering if you want to try a thru-hiking adventure.
This web page gives advice and describes a daily itinerary based on my 2026 backpacking of the southern part of the trail. I call it a "geezer's guide" because I was 67 years old when I hiked it, and thus not hiking as far each day as younger people might. This itinerary is thus designed with older, slower hikers in mind. That said, I moved at nearly the same pace as five young women and a few other men.
Questions? Comments?: Thomas.L.Pratt@gmail.com
Weather:
Weather differs from year-to-year, sometimes dramatically. I developed my itinerary in part by watching the Youtube videos from “Kevin and Leah”, who hiked the trail in 2024. I started on almost the same day as them (March 3 for me, March 6 for them), but in 2026, and had a much different experience. They had a number of days of rain, most of their mornings seemed to be in the high 30s or low 40s with daily highs low enough that they often were hiking in fleeces or jackets. They were walking through patches of snow on Miller Peak, Mount Mica, and Mount Lemmon. In contrast, in 2026 I did not have a single night in which it froze, my evening and morning temperatures were in the high 40s to 60s, and my daily highs were generally in the 70s to 90s. I had an intense rainstorm one night followed by a day of scattered showers, but otherwise my days were mostly cloudless and hot. I only encountered a few hundred feet of snow on Miller Peak. Kevin and Leah’s videos showed them walking through lots of green grassy areas and along some creeks, but on my hike these same areas had brown, dried-up vegetation and many of the creeks in their videos were dry in 2026.
Hikers who started a week ahead of me, though, got caught in snowstorms on Miller peak and Mica Mountain, whereas I was hiking in 70 and 80 degree temperatures on those peaks.
Thus, weather can be extremely variable, so you should expect anything from freezing rain or snow to sunny days in the high 90s. That’s part of the adventure of the Arizona trail – you don’t know what to expect.
Training:
Because of the elevation changes, the southern half is more of an aerobic and leg workout than most of the northern part of the trail (the Grand Canyon being the exception). A lot of hikers therefore use the southern half of the Arizona trail as a “warm up” before starting another trail like the Pacific Crest Trail, especially since you can hike it earlier than other trails.
I was in reasonably good shape when I hiked. I routinely walk 4 to 6 miles a day. I did not do a lot of training for the Arizona trail because I figured that as long as I can make the 2600 foot climb to the southern trail’s high point at 9090 feet Miller Peak on the first day (the trail does not actually go to the summit, but passes nearby), I could get more fit on the trail. Hikers refer to Miller Peak as being a “gatekeeper”: if you cannot make it through this first day, then you should not be on the trail.
My training was minimal: going to the gym a couple of times a week and hiking the equivalent of 400 to 600 hundred vertical feet on an inclined treadmill (set at 25% grade), and leg presses to strengthen my legs. The latter, I think, were the most useful exercise, and I am glad I did them to build up my leg strength. However, my wife and I had hiked around the lake district in England in mid-September (5 months earlier), and that involved 10- to 14-mile hikes over 3000 foot passes (but near sea level). I thus was not “out of shape”.
The 2600 foot climb on day one from Montezuma Pass (6500 foot elevation) to near the top of Miller Peak (9090 foot elevation) is the first test of your fitness. It is another 650 feet of climbing if you hike to border and back on that first day.
Trail-specific gear:
I used a fairly standard backpacking gear list like those you can find online and in Youtube videos (or bottom of this article). There are, however, some specific items that you should bring. First, don’t assume it will not rain – Arizona gets rainstorms that can be drenching and intense. Bring rain gear and a good tent. Rain protection may not be used much, but when you need it you REALLY need it!.
Second, I was paranoid about my air mattress popping, and indeed one of my hiking companions had a slow leak in his that he never could find (maybe from a cactus needle?). I thus brought a 25 inch by 77 inch pad of Gossamer Gear 1/8 inch foam to put under my air mattress to prevent cactus needles, sharp rocks, or other pokey things from popping my mattress. I made this pad by purchasing a 25 inch by 58 inch pad, and a 19 inch wide pad. I cut a 25-inch long section from the 19 inch wide pad and taped it sideways to the bottom of the 25 inch wide pad to make a 77 by 25 inch pad. I kept this rolled tightly inside my backpack (do not fold it or it will get weak spots) so that it did not get any cactus needles or thorns in it if I brushed up against plants while hiking. This pad weighted 5.7 ounces, but it gave me great peace of mind. I did not get any leaks in my air mattress, but I also was careful to clear the ground before setting up my tent.
Third, you definitely want the shorter length (or longer) of NEMO Switchback or Thermarest Z Lite foam pad (they weigh about 10 ounces). Keep it strapped to the outside of your backpack so it is easily accessible during the day. These are indispensable when you want to lie down in the limited amount of shade you find. The ground in that shady area often has cactus needles, sharp rocks, or sticks with thorns on it, and a thicker pad will keep you from getting punctured (I tried a 1/8 inch gossamer gear but it did not protect well enough). I did NOT put this pad under my air mattress at night because I was worried it would pick up a thorn or cactus spine that would puncture my mattress - I used the well-protected 1/8 inch Gossamer Gear pad under the air mattress in my tent.
A lot of hikers wear gaters to keep sand and stones out of their shoes. I carried some with me, but never felt I needed to use them.
I had a sheet of Tyvek to go under my tent to protect the floor from rough rocks and provide extra protection against spikey things. It is much tougher than polycro. It weighed about 7 ounces.
Don’t even think of hiking this trail without hiking poles to help with the steep downhills.
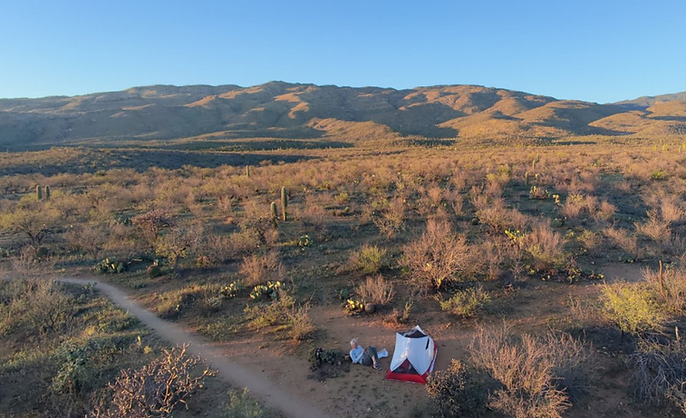
Bring a foam pad to lie on in the shade to escape the heat – you will be glad you did. Most people had orange and silver NEMO Switchback pads. Mine is the vacant one.
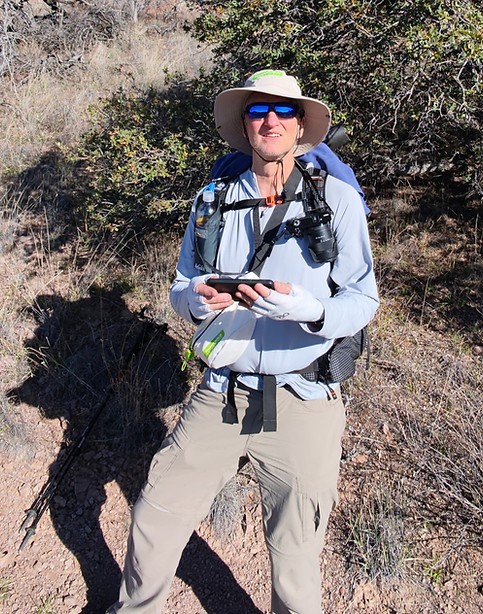
Sun protection:
Surprisingly, I used almost no sunscreen on the trail (don' tell my dermatologist!). Instead, I chose to almost completely cover myself with clothing. I used light hiking pants for sun protection as well as preventing scrapes if I brushed up against a cactus or thorny bush - the latter happened many times, though the cacti were easy to avoid. I used a sun hoodie over my torso, though I did not actually use the hood. Instead, I had a wide-brimmed hat that kept the sun off my face and neck except when the sun was low (and therefore less intense) in the morning and evening. I also wore sun gloves to protect my hands most days. I found these covered me adequately enough that I never got even a hint of sunburn despite rarely using sunscreen (mostly on my hands). If my hat got blown off and lost in the wind (it tried!), then I had the hood on the sun hoodie and sunscreen as backup. I used sunscreen on my legs the one day I hiked in shorts, and I sometimes used it on my hands if I did not want to wear the sun gloves (which got dirty and made my hands sweat).
I had a camera and water bottle on my shoulder straps, and I had a fanny pack slung over my shoulder to hold my cell phone, glasses, and a small drone (HoverAir). The HoverAir drone was light and small and could be controlled with a cell phone, as I am doing here.
Navigation:
Don’t spend more than 5 seconds thinking about it – download the free “Farout” app to your cell phone and then purchase the Arizona Trail guide from within the app (about $25). That’s what everyone uses. The comments posted by other hikers are crucial for planning where to get water, and how much water is needed to get you to the next water source.
Tent:
I slept in my tent almost every night because there were often some bugs and flies in the evening and it kept crawly things away from me. I mostly slept without the rainfly unless it was bad weather. However, a lot of people “cowboy camp”. One night the tent had to withstand drenching rain and very high winds, so don’t skimp on bringing a good tent. I used a free-standing MSR “Hubba-Hubba” 2-person tent, as I am a large person and I like the room. At 3 pounds it weighed more than many tents, but it was durable. I had no real problems putting stakes into the ground (MSR groundhogs), so I would not worry about bringing a treking-pole tent. Obviously do not try to hammock camp, as there is nothing to hang it on along most of the trail.
Backpack:
My “base weight” (backpack weight without food, water or fuel) was a little less than 24 pounds, but then I added nearly 2.5 pounds of camera gear. The longest food carry I had was 4 days (a number of times), so that added as much as 8 pounds of food and fuel. That put my pack weight in the mid 30s, but then I often left a water source with 10 pounds of water. My pack thus weighed nearly 45 pounds when starting some stretches. I weigh about 210 pounds, though, so this made my pack about 21% of my body weight, which is only a touch above the maximum recommended. The weight reduced as I drank and ate, so the weight was generally lower and at the end of four-day stretches when I had eaten my food and drank my water, and after I jettisoned some cold-weather gear after Mount Lemmon, my pack weight was about 22 pounds (plus camera gear). Yes, I would like it to have been lighter but hey, one of my goals was to get in better shape physically and carrying that weight up mountains was a workout!
Bugs:
I did not feel the need to use bug repellent anywhere on the trail, but on a number of evenings I did swat a few mosquitoes at camp. There were also flies in many places, which is a natural result of all the cows and their dung. There were also small flies or gnats in some areas. I therefore slept within the screened shelter of my tent most nights, but without the rainfly unless it looked threatening.
Perhaps the most annoying bugs were the tiny flies or gnats that swarmed in front of my face in some places, especially Mount Mica and Mount Lemmon. They didn’t seem to bite, but it was extremely annoying to have a half dozen of them perpetually flying in front of your eyes. They seemed especially interested in my sunglasses, and their numbers decreased markedly when I took my glasses off – I figure that they must have thought that the dark lenses were small caves or water sources.
Water:
First a warning: water is everything on the Arizona trail, and you need to be extremely careful to make sure you know where your next water source is located and how much water you will drink before you get there.
Water is heavy, and the water sources along the trail are often 8 to 10 to 12 or more miles apart. Hiking in the hot weather (we routinely had temps in the 90’s, especially north of Oracle) means you will be drinking a gallon or more of water every day, plus what you use camping, which means carrying at least 8 to 10 pounds of water when you leave some water sources. If you cannot hike 10 miles or more over elevation changes of 2000 to 3000 feet with your backpack, you should not attempt the trail.
I had capacity to carry 6.6 liters of water (2 one-liter bottles in each of my two pack side pockets plus a 0.6 liter water bottle on my shoulder strap plus 2 liters of “dirty water” bladders that came with my Sawyer filter). On the southern parts of the trail, south of Kentucky Camp, I generally carried only 3.6 liters of water because sources were not far apart. Leaving Kentucky camp and thereafter I routinely had 4.6 liters of water when leaving a water source or town. In a couple of cases I carried out 5.6 liters to be safe; it turned out I did not need that last liter, but there is always some uncertainty about whether a particular water source still has water so I tried to always have a liter on me when I reached a water source. In other words, I tried not to rely on a specific water source unless I was positive there was water there.
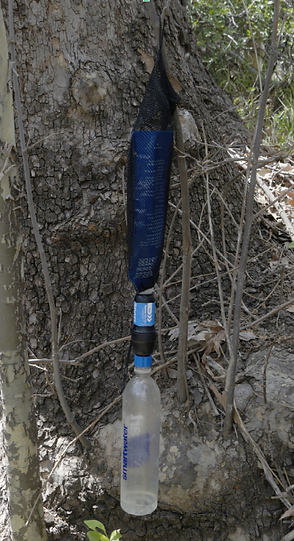
Most everyone I hiked with used a Sawyer Squeeze water filter. It makes it a lot easier if you get the blue coupler from Amazon to attach a smartwater bottle to the filter, thus allowing for gravity feed but also allowing backflushing of the filter.
Connect the coupler tightly to the filter and loosely to the Smartsolo bottle (so that air can escape the bottle while it fills), put the squeeze bag in the net bag that comes with the filter, and you can gravity feed. Or you can just squeeze the top bag. After filling the water bottle, take the top squeeze bag off, tighten the filter onto the bottle with the blue coupler, turn it upside down, and squeeze the water bottle to backflush. That way you do not need to bring the syringe that comes with the filter.
Water sources can be frustrating, because you cannot be absolutely certain that water will still be at any given source.
There are some sources that are always reliable, and I focused on them and did not count on the ones on which other hikers a few days before commented on Farout, for example, “a few puddles of clear water” (which might be dried up before I got there). Look carefully at the date these comments were left to make sure they are current.
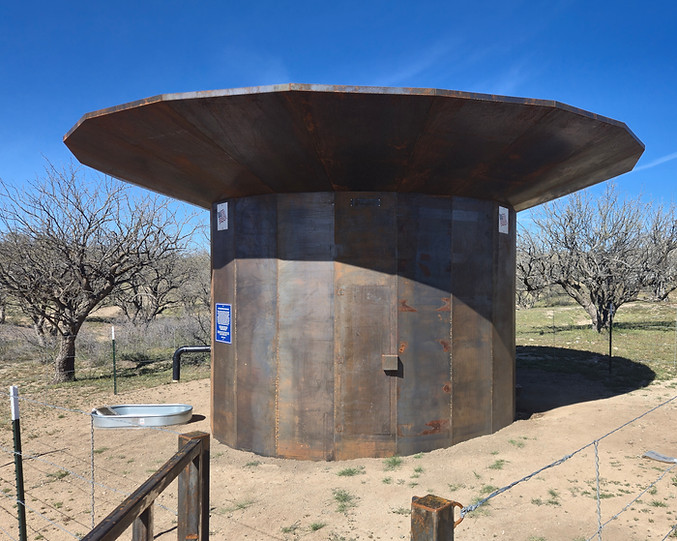
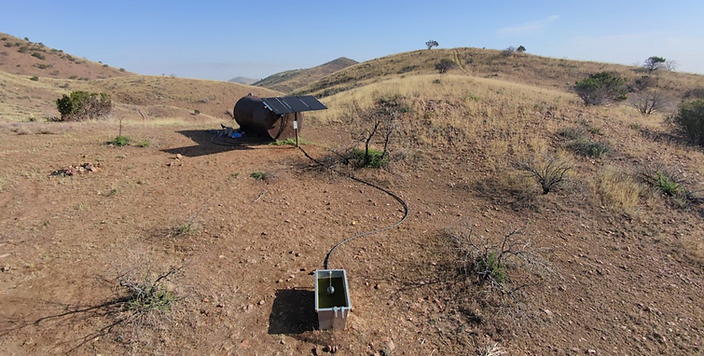
I asked the Arizona Trail Association about how reliable the rain collectors are, because at least twice I arrived at them nearly out of water and was worried they might be empty (they are in the longer dry stretches for a reason). Their response was: “The rainwater collectors are grossly over-engineered to hold way more water (1500 gallons) than trail users would use in a season and are a reliable water source year round.”
Do not let your water filter freeze or its inside will crack – I kept mine in a plastic ziploc sandwich bag when not using it to prevent it dripping on things, and put it under a pile of clothes or in my backpack in my tent if it looked like it might freeze that night. I did not get a frost at night, though, so having my water filter freeze turned out to not be an issue.
Left: gravity feeding water through a Sawyer Squeeze filter. Right: one of the rain collectors that the Arizona Trail Association has installed.
Water myth-busting:
Many hikers describe filtering water from chocolate-colored cow ponds, in which cows often stand in the water while relieving themselves. Indeed these ponds look disgusting, but between the Mexican border and Lake Roosevelt I never had to use one with my 4.6 liter normal capacity – all of my water sources were quite clean, meaning they were relatively clear and silt-free. One exception could have been Twin Tanks, which is the first water source for for about 13 miles when hiking from the south. It looks idyllic, but it is one of those disgusting cow ponds. Some friends who hiked the trail earlier had warned me about this. It is easy to avoid needing water from Twin Tanks, though, if you hide a gallon or two of water there. It is only about a half mile off a main road, so it is easy to stash water there before you begin your hike (see day 2 of the itinerary below). Pack out any containers so that you do not litter.
The other silty water was the Gila River, which has a reputation for getting people sick. You have no choice but to drink from the river because it is the only water source for many miles in either direction. It filtered cleanly, but I also added iodine tablets to be safe. Some of my hiking companions only filtered the water and did not suffer any ill effects.
The other caution is to make sure you have plenty of electrolyte tablets or powders, because you will sweat A LOT when it gets hot! I generally used 3 or 4 Nuun tablets on the hotter days north of Oracle.
Twin tanks looks like Eden until you see the chocolate-colored water surrounded by cow dung.
Food storage:
I slept with my food, stored in “Smelly” bags. I put the food into “Smelly” odor-proof bags, then put these inside turkey roasting bags (with a separate bag for trash). Turkey Roasting bags can be purchased cheaply at the grocery store, and they apparently reduce odors dramatically. I then put these into a Sea-to-Summit waterproof bag, which further reduces odors. I then put the bag in my tent each night. I had absolutely no problems with any animals (bears, coatimundis, mice, etc.).
See https://backpackinglight.com/dispatches/the-nose-of-a-bear/
That said, there are definitely bears in the mountainous areas, and they probably come to lower elevations at times. There is always a chance that a bear that is acclimated to humans could enter your camp. I decided to take my chances because it is extremely rare for bears to attack humans to get food except in places overwhelmed by tourists (Yosemite, Shenandoah, etc.).
If you want to be certain about protecting your food, you can bring a bear can.
Costs:
My suggested itinerary is not cheap if you want to cheat on Mount Lemmon (see below). Outside of Mount Lemmon, the rental car and hotels will end up costing about $600. Adding in my Mount Lemmon plan would add about $800 more. This additional money, though, will save quite a bit of uphill climbing and will likely save you a day of hiking. You can avoid almost all of these costs if you simply fly to Tucson and get a shuttle to the starting point.
The above costs do not include any hotel, food, or other transportation costs that hikers normally have. Remember to give trail angels a tip if they give you a ride or a place to stay.
My itinerary
Below is my suggested itinerary and logistics, based on my hike of the southern 340 miles - I could only take 5 weeks off from work, and 340 miles was about the right distance for this time length if you add in the "zero" days. I began at the Mexican border and hiked to the marina at Roosevelt Reservoir. I flew to Tucson on February 28 (day 0). I only list hiking days here, not counting “zero” days. I started the real hike from Montezuma Pass on March 3, and finished at Roosevelt Marina on March 30; this included four “zero” days in Patagonia, Tucson, Kearny and Superior.
Day 0:
Fly to Tucson and book three nights at La Quinta or Hampton Inn, which are both easy walking distance from the airport (a couple of blocks). Get a 3-day rental car from the airport. Arrange a shuttle from your hotel to the trailhead for 2 days from now (day 3) – I used “Finding True North”, but there are other options (“Sunshine Tours”?). The shuttle services are listed on the Arizona Trail Association web page, and they advertise themselves on the Facebook page each year (the group “Arizona Trail class of 2026”, for example). I paid $70 plus a tip for the driver. You may also be able to find a trail angel to give you a ride, but it is a long drive from Tucson. Trail angels are listed in the FarOut app and on the Arizona Trail Association website.
While you are thinking of reservations, go online and book campsite reservations in Saguaro National Park for 8 to 10 days from now. They allow for a 10-day window for camping at either campsite, so you do not need to get the dates exact. You need two permits: one to enter the park, and another to camp in the park. I had a senior entry pass that was good at all national parks, so I only had to purchase the camping permit.
Day 1:
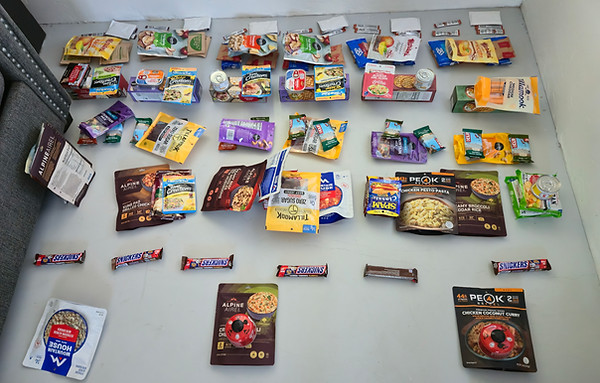
Purchase supplies – food for 13 days, a gallon or two of water to stash at Twin Tanks, gas for your cook stove if you are using one. There is a well-equipped REI in Tucson, right next to a Dick’s outdoor store. Your first part of the trail will be 4 days, at which point you will reach Patagonia, so keep food for that length of time (lunch and dinner day 1; 3 meals on days 2 and 3; breakfast and lunch on day 4). I won’t include snacks in this food list, but obviously get as many of those as you feel you need. Don’t forget electrolytes.
Mail a couple of resupply boxes:
Mail a box with 4 days of food/gas to Colossal Cave visitor center, or drop it off there today or on day 2 because it is near Tucson. (breakfast, lunch, dinner for 4 days). You will get there on day 8 or 9.
Mail a box with 5 days food/gas to the post office or, if possible, the Lodge at Summerhaven (top of Mount Lemmon). The Lodge is a better option than the post office (if they allow it – call and ask) because they are open every day with extended hours, whereas the post office has more limited hours and is closed on Sundays. The owners of the lodge are longtime residents who have hiked the Arizona Trail, so they may be amenable to a food resupply. The store in Summerhaven is not bad if you are not too picky (though expensive).
Twelve days of food. The Snickers bars were a disaster - I could not keep then cool enough to prevent melting.
Day 2 (hike 3.6 miles to Mexican border and back with empty pack):
Drive down to Montezuma pass, hike to border and back with a nearly empty pack – this will save you 3.6 miles roundtrip and 670 feet of uphill climbing when you start the trail for real on day 3. It is also a chance to do a relatively mild hike to get acclimated, which is especially useful if you are coming from sea level like I was.
While driving down or back, hide a gallon or two of water next to Twin Tanks – enough to camp one night and hike possibly as many as 12 miles the next day (to Cienega Creek, although there may be water at one of the trailheads before that). Twin tanks is only about 1 km west of the highway to Sanoita, which is nearly en route to Montezuma pass, and I actually drove a rental car down the dirt road to the tanks. Twin Tanks is the only water for about 13 miles when coming from the south, so you will need water there. Twin Tanks, however, is one of those chocolate-milk-colored ponds that the cows stand in while doing their business. During my 2026 hike, this was the only really objectionable water source I would have needed, but because I hid a couple of gallons of water there I did not need to use the pond. You will be happy for the clean water when you see the pond.
You will also pass very near the Colossal Cave visitor center when driving from Tucson to Montezuma Pass, so you can drop the resupply box there instead of mailing it. Get some prickly pear ice cream and enjoy the view while there.
Return the rental car that evening and walk to your hotel.
Day 3 (8.3 miles): Montezuma Pass to 0.7 miles past Bear Spring trail (mile 10.1):
Take the early morning shuttle to Montezuma pass to start the actual hike. “Finding True North” picked people up at 6 a.m. from the La Quinta, which is right next door to the Hampton Inn, both being a block or two from the airport. Make sure you get breakfast before getting the shuttle, although they did stop at a gas station/quick mart after about an hour of driving.
Start the hike at Montezuma pass, where the shuttle will drop you at about 9 a.m. You can laugh at the other shuttle passengers who will have to hike 3.6 miles down to the border and back, because you already did that.
Today is a rough day, especially if coming from sea level – it is unrelenting uphill for nearly 5 miles, from the 6570 foot elevation at the pass to 9090 feet as you pass the high point near Miller Peak (more if you decide to hike the half mile to the Miller Peak summit for the fabulous 360-degree view).
1.6 miles past the high point you come to your first water – bathtub spring at mile 8 (6.2 miles into your hike, since you started at mile 1.8). You thus need to have enough water to make it a little over 6 miles with a 2500+ foot elevation change (11.6 miles and 3300 feet elevation if you also hike to the border and back), likely in hot weather. I drank about 3 liters before getting to bathtub spring, as it was a hot day with temps in the 80s when I started.
I camped the first night about 0.7 miles past the junction with the Bear Spring trail, near mile 10.1. This was a nice campsite right next to the trail.
Looking back at Montezuma pass. Note the parking lot at the pass in the center of the photo.
Day 4 (12.9 miles): To campsites next to creek at Parker Canyon
This was a mostly downhill day to Parker Creek at mile 23. The creek is nice, with lots of campsites around it. There are several water sources that likely (nothing is guaranteed) have water along the way. This is a popular stop for hikes, with lots of good camp sites, so you will likely find others camped here as well.
Day 5 (13.8 miles): Parker Canyon to campsite near mile 36.8
There are not a lot of water sources along this stretch, so watch your water. Near the end of the day you will pass the Canelo Pass trailhead, where there is a water cache that likely (not guaranteed) has water in the bear box. The next day I happened to meet the trail angel who keeps it supplied, and he asked how much was left – he thus keeps an eye on keeping it supplied. There are a couple of other potential water sources along the way (cow tanks are not desirable, but will do in a pinch).
There are some campsites right next to the trail near mile 36.8.
Day 6 (15.5 miles, or 11.2 miles): Arrive in Patagonia
You reach State Route 82 north of Patagonia near mile 52. There are several good water sources along this stretch of trail, especially the clear water in the cow trough (or push the bobber down to get it directly from the spigot) at the ranch with the windmill near the red cliffs. You can save about 4 miles of hiking by taking the 3.7 mile old AZT to the Hershaw Road trailhead, which is what I did. I am not sure the trade-off is worth it, though, as the trail to Hershaw Road is pretty rough with steep downhills on slippery gravel.
There is a hotel in Patagonia (Stage Stop Inn) that is pricey, but they do give discounts to members of the AZ trail association. Alternatively, the Terra Sol hiker hostel is a much cheaper option but you may be bothered by some late-night conversations going on among other hikers. You can also do a quick resupply and camp just out of town (Terra Sol might allow you to do laundry and showers?).
There is a decent grocery store for resupplying, and Terra Sol sells gas cans if the store does not have them (but call first to make sure).
I took a “zero” day at Patagonia (a friend actually picked me up to spend a day in Tucson), because I figured I would need a rest at that point, though I do not feel I actually needed it. But let’s keep this itinerary to only counting hiking days.
The wet area in the lower center of the photo has a cow trough with crystal-clear water in it (probably mixed with a little cow saliva, but what are water filters for?). You might be able to get the spigot to the trough working to get water out of the pipe instead of the trough.
Day 7 (about 15 miles): Patagonia to just past El Pilar (mile 68.5)
Starting from Patagonia, it is a pleasant hike with gentle slopes to the “El Pilar” water source at 67.6 miles (yuck – I am glad I filled up earlier), after which you cross a beautiful valley that surprisingly has no campsites in it. At the top of the next ridge, about a mile past El Pilar, at the top of a climb, there are some roads and a large flat area near mile 68.5 with room for many tents. This is a nice trail with moderate ups and downs but no major climbs.
Mount Wrightson dominates the skyline on the trail for a couple of days after Patagonia.
Day 8 (16.8 miles): Hiking through gold-mining country
You hike through gold-mining territory today, including Kentucky Camp at mile 77.1. This is the gold mining camp where James Stetson had a home (nope, nothing to do with Stetson hats). There are several water sources in the morning, including a spigot at Kentucky Camp. Kentucky Camp is a great place to rest (I had lunch there) as there is a wide porch with some picnic tables and chairs, as well as the water spigot and pit toilets. I left Kentucky camp in early afternoon after a long rest during which I charged my electronics. I camped at a lovely campsite with a view of Mount Wrightson just before the gate at mile 85.3; however, there was a storm that night and I got hit hard with rain and very strong winds that battered my tent. I was glad I had an MSR tent, as they are are known for standing up to bad weather.
Day 9 (about 15-18 miles): Gate at mile 85.3 to near Twin Tanks just past mile 100
There are a couple of water sources early in the day, but then there is a long stretch before Twin Tanks without any good water sources. Twin tanks looks kind of idyllic (my photo of it makes it look great), but in fact the area around the tank (pond) is a rocky area full of cow manure. You will likely want to camp a little ways past it. There are some good campsites about 1.8 miles past Twin Tanks.
Day 10 (variable miles)
Twin Tanks to Gabe Zimmerman trailhead (mile 112.9), or near Cienega Creek (mile 113.3), or campground at Colossal Cave (mile 120). There are pit toilets “sanicans” at the trailhead, as well as a shaded picnic table. The campground at Colossal Cave has picnic tables, pit toilets and water spigots.
This is a pretty flat hike that includes the famous “Snake” tunnel under interstate 10. There are effectively no water sources along this section of trail except possibly a cache at Suhuarita trailhead. Just past Gabe Zimmerman trailhead you will cross Cienega creek which likely will have water running in it.
I had a friend pick me up from Gabe Zimmerman trailhead and bring me to Tucson for a “nearo”, so I did not check out campsites in the area. However, there likely are campsites along the creek just past Gabe Zimmerman trailhead.
If you feel ambitious you can continue hiking to Colossal Cave visitor center and one of the two campgrounds there, one of which the trail passes through (but you’ll need to pay to camp). Get yourself some prickly pear cactus ice cream and/or a prickly pear cactus margarita at the visitor center. The visitor center at Colossal Cave is a bit of a hiker hangout, so you will likely meet other hikers there if you spend some time. We saw 8 other hikers there, most of whom we continued to intersect with for the next few weeks.
Day 11 (14 miles): Gabe Zimmerman trailhead to Rincon Creek (mile 126.8)
Starting at the Gabe Zimmerman trailhead (or wherever you camped), hike to Rincon Creek just outside of the border to Saguaro National Park. This is 14 miles from Gabe Zimmerman trailhead, at mile 126.8. This is a relatively flat day of hiking. Rincon Creek is a lovely water source when I was there, and right near the sign at the entrance to the park there are some nice flat campsites.
Camp just outside of Saguaro National Park. The sign at the entrance is next to the trail just barely to the left of the photo.
Day 12 (9 miles): Border of park (mile 126.8) to Grass Shack Campground (mile 135.6)
This is a relatively short day distance-wise, hiking through the forest of saguaro cacti, but it is about 2600 feet uphill to Grass Shack Campground at mile 135.6. Some hikers go the extra 4.2 miles to Manning Camp Campground, but this adds another 2700 feet of uphill. I decided to break the climb over Mica Mountain into two days, and I am glad I did because I reached Grass Shack Campground feeling quite tired. That said, Manning Camp looked like a nicer campground, though at a much higher (i.e. colder) elevation. You need an entrance permit to enter the park, and a separate camping permit to spend the night (indeed a ranger checked my permits). There are creeks next to both Grass Shack and Manning Camp campsites.
Because camping is limited to two campsites in Saguaro National Monument, you will likely be camping next to some of the hikers you have already met or will be hiking with going forward. I camped at Grass Shack with 5 other hikers, and we were running into each other daily for the remainder of my trip, including in Kearny and Superior, and a last lunch at Roosevelt Reservoir before they continued on and I ended my hike. We did not form a “tramily” (trail family) in the sense of hiking next to each other all day or arranging campsites together, but we often found ourselves together at campsites, water sources, and in towns. Meeting up is an advantage of a long trail with limited water sources, campsites, and towns – you often find yourself resting or camping with the same people.
Day 13 (11.6 miles): Grass Shack campground (mile 135.8) to mile 147.2
This is a tough day that includes going down the 3rd-worst downhill on the southern part of the trail. Hike from Grass Shack Campground to Manning Camp, and feel a little jealous of the people who hiked to this nicer campground (but froze at night). Fill up with water in the creek downhill behind the log building (from the building, head downhill and to the left). This is the last good water you will see for a long, long time - Italian Spring at mile 142.4 has a small amount of water, but it certainly did not look appealing to drink.
Hike over the top of Mica Mountain, through beautiful pine forests. There are fabulous views once you get over the peak and continuing down the north side.
The downhill on the north side of Mica Mountain is awful – one of the worst on the southern part of the trail (but not the absolute worst – that comes later). A lot of the trail is steep, and covered in gravel, so slipping is an ever-present danger. Views are fabulous, though.
After the long downhill I camped about 50 feet past the turnoff (sign) to a side trail at mile 147.2. There is a nice creek about a mile before I camped, which was the first good water I found since Manning Camp. This resulted in an 11.6 mile day with 3380 feet of uphill and 3970 feet of downhill.
Day 14 (13.8 miles): Camp at 147.2 to Catalina Highway at mile 161.6.
This was a hard day with lots of little uphills and downhills. The only good water was at the Reddington Road raincatcher (mile 151.3) that you pass early in the morning. There was a cow pond at mile 155.5, but it did not look appealing. West Spring at mile 159.4 was dry, though the damp ground suggested there might have been water there recently. After West Spring, there is an uphill climb before dropping to the Catalina highway
When you reach the Catalina Highway, you have several choices – you can camp at Molina Campground (maybe no water there, though – you would need to stash some earlier, on day 2, or hike farther), you can hitch a ride into the Tucson suburbs and get a hotel (which is what I think most hikers do), or you can cheat by going down Mount Lemmon instead of up (see below). If you choose the first two options, in the next couple of days you will need to hike the 22 miles and 3400 foot uphill to the town of Summerhaven, at the top of Mount Lemmon.
The trail between here and Summerhaven is quite pretty: along a river valley (take a swim in Hutch's Pool), a steep climb to beautiful views at Romero Pass and above, an interesting hike through the "wilderness of rocks", and good camping next to Lemmon Creek.
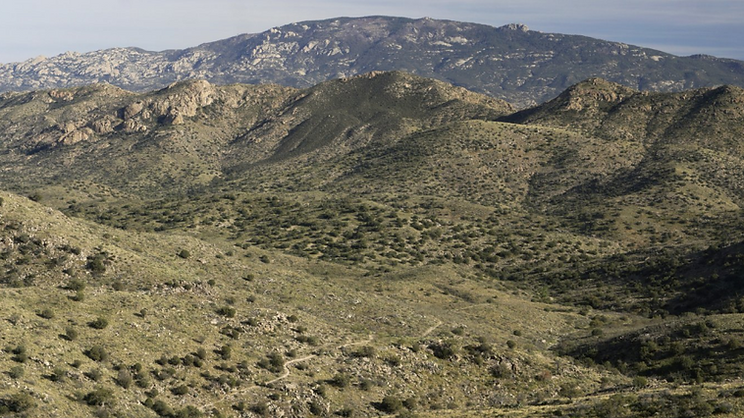
View from the pass just before descending to the Catalina Highway, with Mount Mica in the distance.
Cheating on Mount Lemmon (days 15 and 16):
No sense climbing up Mount Lemmon when you can hike downill instead! This strategy will cost about $800, but it will likely save a day of hiking, including a lot of hard uphill climbing, and will give you a couple of nights in a hotel or cabin.
When you get to Colossal Cave, you will be 3 to 4 days from reaching the Catalina Highway, which is the road that goes up to Summerhaven at the top of Mount Lemmon. Book two nights in a cabin (about $200/night) or a Lodge room (about $300/night) at Summerhaven, the first night being when you think you will reach the Catalina Highway.
When you reach the Catalina Highway at Molino campground, take an Uber to the top (or hitchhike) where you have the room reservation. It will likely cost about $100 for the 45-minute Uber ride.
Next day, leave most of your gear in the cabin or hotel room and hike down the south side of Mount Lemmon with a nearly empty pack, taking the side trail down Sabino Canyon to the visitor center if you want to shave a couple miles off the hike. This is a LONG day (20.5 miles with a very steep downhill above Romero Pass), so get an early start. You hike through the “Wilderness of Rocks” which is a pretty amazing place (photo below), and there are great views. There is an especially good view from some flat rocks near the trail just before you begin the steep downhill stretch to Romero Pass. This downhill above Romero Pass is one of the worst – a steep trail with lots of loose gravel to slip on.
From the Sabino Canyon visitor center, Uber back to the top of Mount Lemmon (about $120).
Next day, hike down the north side of Mount Lemmon to Oracle. When hiking to Oracle, take the old AZT down Oracle Ridge instead of the new trail down the adjacent ridge. The new trail goes down Red Ridge, but then crosses a deep valley with a steep climb to get back to Oracle Ridge. It is much easier to take the old AZT down Oracle Ridge, which is a gentle downhill all the way with fabulous views.
The result of this strategy is that you hike DOWN both sides of Mount Lemmon, rather than hiking up the south side and down the north side. It also gives you a couple of nights in a cabin or hotel. You also likely saved yourself a day of hiking.
Wilderness of Rocks.
Hiking down Oracle Ridge.
Day 17: Near Oracle (highway at mile 207.7) to near mile 215.2
Once you reach Oracle, you can either stay at a hotel or B-and-B, or you can camp nearby. There is a Dollar General store in Oracle, but it is a long way from the trail (as is the entire town). It is easier to just camp near Oracle rather than going into town, especially if you just had a couple of nights in a cabin or hotel at Summerhaven and you picked up a resupply (or went to the store).
The hike from Oracle to Kearny is across a relatively flat, nearly shadeless desert. Hiking out from Oracle, in about a mile and a half from the highway you will pass the Tiger Mine trailhead where there is likely a water cache (fill up!). There is also a cache at the highway before that which may have water, and there may be water at the American Flag trailhead or at Oracle State Park. There is also water at High-Jinks ranch shortly before the American Flag trailhead. One way or the other, do not leave the Oracle area (Tiger Mine trailhead) without filling up with water, as the next reliable water sources are Mountain View Tank at mile 221.4 (and a quarter mile off trail) or Beehive Well at mile 228.6.
After leaving Oracle, I camped at the dirt road intersection near mile 215.2, where there are a couple of nice flat spots near a fence.
Day 18 (16.1 miles): near mile 215.2 to mile dirt road at mile 231.3
After filling up at Mountain View Tank and then Behive Well (mile 228.6), I hiked another 2.7 miles and camped next to the dirt road at mile 231.3. Be careful not to camp on the road itself, though, as a pickup truck came down the road at a relatively high speed at about 1 a.m. the night I was there. This stretch, as well as the next couple of days, are relatively flat, just going up and down small hills.
Beehive well
Day 19 (17.7 miles). Road at mile 231.1 to wildlife rain collector at mile 248.8
The wildlife rain collector is a large, flat, roof-like structure about the size of a house (but at ground level) that catches rainwater for a wildlife trough. It is about a quarter mile off the trail, over a small hill, with quite a few campsites in the area (camp at least 200 feet from a single water source like this, though, or animals will be scared to come get water). Under the roof-like structure are a couple of large tanks that hold the water, each of which had, I estimate, a few thousand gallons in them. You can crawl under the roof-like structure, unbolt the lid, and scoop water from the tanks (much cleaner than in the adjacent trough). A least one of my hiking companions took a nap in the shade under the collector, but others spotted rattlesnakes down there.
Day 20 (16 miles): Wildlife tank to bridge near Kearny (mile 265)
A mostly downhill hike today, at the end of which you reach the road into Kearny, with the Florence-Kelvin Road trailhead, the Gila River trailhead, and the main road intersection all within a couple of miles of each other. If you are hitching, it is best to cross the bridge to get to the main road (there is water at the side of the department of transportation office there). You may be able to get a ride at the Florence-Kelvin trailhead, though (water cache there also).
When I reached the Gila River trailhead I got a ride into Kearny from a friend, and I took a “zero” in town. I stayed at the General Kearny hotel, which is the only hotel in town. It is basic, but good, and walking distance to everything (not that there is a lot of stuff in town!). There was a trail angel who housed some of the hikers I had intersected with, but the trail angel had just retired and was planning to move out of town in 2026.
Kearny is an accessible town with a really good IGA store and a pizza place that is famous in the hiker community. The IGA has a good deli with breakfast burritos and coffee, and they apparently give free coffee and donuts to hikers (I did not ask about this, as the burritos looked good). I really enjoyed the zero day in Kearny because a large number of hikers (most of them?) take a nearo or zero there. It was thus a great place to interact with other hikers, many of whom I had been meeting for a while. Four of the hikers there had camped with me as far back as Grass Shack over a week earlier, and I hiked with most of them over the next few days, including eating lunch with some of them at Roosevelt Marina on my last day.
Day 21 (18.6 miles): Down the Gila River, then uphill to camp at mile 283.6
This stretch from Kearny to Superior is one of my favorite sections of trail. If you have only 2 or 3 days to hike, this is a stretch to consider. We did it in two long days: Day 1 was from Kearny to just past the AZT low point, and Day 2 was from camp at mile 283.6 to the Picket Post trailhead near Superior.
The first day is a pretty stretch down the Gila River valley, with great views of the valley. The trail has some ups-and-downs, but is generally nice. Just past the AZT low point at mile 281.1, you can take a left and go about a quarter mile down a dirt road to the Gila River. This is the first place where water is easily accessible, though there is a wash a few miles earlier down which you can also get to the river. We left Kearny before dawn and hiked the 16 miles down the valley without stopping for water until just past the trail low point.
After resting and wading in the river for a couple of hours to escape the heat, we hiked about 2.5 miles uphill to a saddle with a couple of great campsites at mile 283.6 with good views. Make sure you have plenty of water when you leave the Gila river because the next water source is the rain collector at mile 290.6 and you have a lot of climbing to get there.
Day 22 (19 miles): Camp at 283.6 to Picket Post trailhead at mile 302.3 (town of Superior)
This is one of the most scenic days on the trail, as you hike over a saddle with expansive views and then along the side of a ridge with views into a deep valley with interesting rock formations. You pass a rain collector at mile 290.6 where you can relax in the shade after filling up with water. The next water is at the trailhead at mile 302.6, so be sure to fill up and hydrate at the rain collector.
We stayed in Superior with the famous trail angel MJ, who picked us up at the Picket Post trailhead. It was a long day, which we started in the dark at about 4:30 a.m.
I took a “zero” in Superior, which is a cute little town, staying at MJ’s with 5 or 6 other hikers. They have a good grocery store in the downtown area as well as some good restaurants. The hotel, though, is quite expensive, so it is worth splitting a room if you choose to stay there.
Near Superior is the Boyce-Thompson arboretum, which is worth a look. I swear it has about 345 million different species of cacti – who knew there were so many?
Days 23, 24, 25: through the Superstition Mountains to Roosevelt Marina.
Day 23 (19 miles): Superior (mile 302) to just past Rogers Spring near mile 321
The first part of the day is a pleasant hike along a dry or barely flowing stream (don’t count on this for water in dry years). I walked the road instead of the trail for part of the way, as the road was flatter and I got some trail magic from some picnickers. You reach a trailhead at mile 312, after which you have a long uphill climb to a saddle and gate with fabulous views.
After the saddle you hike on a road for a while with some more great views, and then follow the trail down a creek. We camped in the creek, which was dry, at about mile 321. There was a water source at Rogers Spring about a mile before this, at about mile 320. Normally I would not camp in a wash, but it was dry, no rain was forecast, and there were not a lot of flat spots.
Day 24 (11 miles) near Rogers spring (mile 321) to near high point at mile 332
This hike goes through a beautiful part of the Supersititions – Reavis Ranch. After following a creek uphill you come to an extremely pleasant valley that was an old homestead, with a creek along part of the valley.
The trail then takes a right turn and crosses the creek – fill up all your water here because it is a long, long way to the next water source (another creek later might have pools of water, but keep your water full). You climb a long hill to a pass, and then the hard part begins.
At the top of the pass you will be looking across a valley about 1000 feet deep. The trail both down and up the sides of this valley are steep and often gravel-covered. I think this is the second worst downhill on the trail (tomorrow is the worst). In the description of the next day, I link to a video where some hikers complain about the steep downhill and uphill of this valley.
After crossing the valley you come to a long ridge walk in grassy fields with fabulous views. I camped about 0.8 miles before the high point, in a grove of trees.
The deep valley with the steep trail down and up, with loose gravel.
Day 25 (10 miles) mile 332 to Roosevelt Lake at mile 342
I thought this would be an easy 10-mile downhill to Roosevelt Marina, but it turned out to be anything but. The first couple miles from camp is over the high point and along a ridge with spectacular views. Then it is a nice hike down to the big tank and cattle trough near mile 334. The tank has great water from the spigot in a nearly new cattle trough. (It did not taste like gasoline, as some have commented.)
After the cattle trough things get difficult as you hit by far the worst downhill I encountered on the trail, or any trail for that matter. The downhill is along steep dirt roads and down a wash. It is astonishing how steep of a dirt road 4-wheel drive vehicles can go up! In many places the dirt road is hard sediment or bedrock covered with sand or gravel perfectly designed to make you slip. The wash is not much better, as you hike through soft sand and over boulders and cobbles, with the hard-to-find trail wandering in and out of the wash (look for stacked rock cairns to guide you). After the wash is another steep dirt road till a trail for the final mile or so to the marina.
I follow a very experienced thru-hiker named Liz Kidder on Youtube. She hiked the Appalachian trail and Pacific Crest trail with no problems, and she was hiking the Arizona trail when she and her friends (also very experienced hikers) came to the deep valley described yesterday, and then this downhill stretch. If you start at about the 11:55 minute mark and watch about 6 minutes of this video (to about 18:15):
https://www.youtube.com/watch?v=ujAFSiaxpjk&t=1078s
you will see them complain about “the scariest descent of my life and the sh**iest climb ever” through the steep valley that I went through yesterday, and then after the water tank you can follow them hiking the awful downhill section. To spoil the surprise, she complains about the hike through the wash (one of the very few times I heard her complain about a trail in her videos), then she slips on the steep dirt roads, breaking an ankle bone (she finds out when she gets to a hospital in a subsequent video). She limped to the marina, but her thru-hike was over at Roosevelt Marina. It's not the best section of trail to end the hike on.
The marina, however, is a great place if you arrive mid-day or early afternoon when the restaurant is open. They have burgers, sandwiches and pizza, as well as a selection of drinks including a bar. You can sit in the shade overlooking the lake. It's a wonderful place to relax. They have a store there with a wide variety of drinks and snacks, but definitely not an easy place to resupply. They do have breakfast burritos that can be microwaved if you get there in the morning. They also had a large stack of hiker resupply boxes that had been mailed to them.
Across the parking lot from the marina is a shed full of hiker stuff. I think I could have almost resupplied here, as there were partially full gas cans, toilet paper, and a selection of food. I added my leftover food and mostly full gas can.
The drawback to ending your hike at the marina, like I did, is that there is no public transportation out of there, and it is remote enough that you are unlikely to get a ride service or taxi. I spent the night in a trail angel's yard, then ended up hitch-hiking about 30 miles south to Globe, getting a noon-time bus to Phoenix Airport, and taking a shuttle back to Tucson.
Would I hike it again?
In a heartbeat! Like any trail, there are parts that can be miserable, like the last downhill I just described, or parts of the hike across the shadeless desert between Oracle and Kearny with temperatures in the high 90's. But these bad memories fade rapidly from your mind as you recall the wonderful parts of the trail, the interesting people you met and shared comradery with, and the feeling of adventure provided by completing a long stretch of difficult trail. I have been missing the trail ever since I sadly watched my hiking companions leave Roosevelt Marina and continue their hikes without me.
What would I do differently?
I would focus more on the social aspects of the trail, which came as a bit of a surprise to me. I wish I had spent more time talking with and interacting with other hikers early on. Later in my hike I found I was spending quite a bit of time with a group of hikers that I had seen earlier - I wish I had spent more time developing those relationships earlier in the hike.
First thru-hike?
Some people say that the Arizona trail is not a good trail for your first thru hike for various reasons. I disagree. This was my first backpack trip greater than a few days since a 2-week trip during my college days 45 years ago. The logistics for the Arizona Trail were not all that complicated, and for the first 180 miles (until Summerhaven) it would be easy to go to a road and hitch or Uber to Tucson (for about $100 to $150 in some areas). The logistics are thus simple, so long as you are willing to throw a bit of money to Uber to town if you need to.
The only logistical issue that is more difficult than any other trail is that you really need to pay attention to where and when your next water is going to be obtained. That should be your main concern, as it can be life-threatening if you run out. However, I did not find it at all difficult to deal with the water planning (load up at water sources and deal with the extra weight in order to be safe!), and a lot of other people hike the trail without any issues with water. I have not heard of a thru-hiker dying on the Arizona Trail due to dehydration, though day hikers sometimes perish on other trails in Arizona. Use common sense and fill your 4 to 5 liters of water bottles when you can, and you should be fine.
The trail is also more strenuous than many trails because of the substantial elevation changes. Just take it slowly and be careful.


A geezer's guide to hiking the southern part of the Arizona Trail

Gear list:
Gear I started out with (not including camera gear)
backpack: Hyperlite southwest 70 liter 41 ounces
tent: MSR Hubba Hubba 2-person 50.2
Ground cloth: Tyvek (from construction site) 6
sleep pad: NEMO Tensor all-season, long wide 23.1
foam pad beneath sleep pad: Gossamer Gear 1/8 inch (77 by 25) 5.7
Foam pad for resting: NEMO Switchback 51 inch 10.1
sleeping bag: REI Magma 15 degree (long wide) 44.3
fanny pack: generic (freebie at a convention) 4.5
backpack liner (for sleep bag): Nyloflume (waterproof) 0.9
trash compacter bag (for wet tent): generic grocery store 1.8
water bottle holder on shoulder strap: REI cell phone holder 1.0
(their cell phone holder fits a small Smartwater bottle quite well)
total: 188.6 ounces
(11.79 lbs)
Cook kit
Pot and lid: Soto Amicus 1-liter 8.4
Stove: Soto Amicus 3.2
banadanas (2): generic 1.5
coffee cup: Sea to Summit collapsible 1.8
spoon: titanium long handle 0.6
fork/spoon combo: generic 0.5
lighter: Bic mini 0.4
odor-proof bags: Smelly Odor-Proof (5) 3.7
turkey-roasting bags (2): generic grocery store 1.1
sponge and camp soap: generic (biodegradable) 1.5
` total: 22.7 ounces
(1.42 lbs)
clothing worn (not included in backpack weight)
Sun Hoodie: Mountain Hardwear 7.6
hiking pants+belt: REI convertible or Sahara 16.0
socks: Darn Tough crew 2.2
hiking shoes: Brooks Cascadia/Saucony Peregrine 26.9
(I alternated, swapping when at my friend’s house in Tucson)
sun gloves: Outdoor Research 0.7
sun hat: generic wide-brimmed (freebie at a convention) 3.6
hiking poles: Black Diamond aluminum (old) 21.6
underwear: UnderArmour 2.4
sunglasses: cheap Walmart 0.9
total: 81.6 ounces
(5.12 lbs)
clothing packed
rain jacket: Patagonia Torrentshell 14.7
rain pants: REI 10.3
puffy: REI hooded 850 puffy 15.1
fleece: Mountain Wearhouse 8.7
shorts (sleeping/town): Nike running 4.7
t-shirt (sleeping/town): generic Walmart synthetic 5.6
gaters: generic at REI 1.1
baseball cap: generic 2.4
underwear (2): UnderArmour 4.8
socks (2): Darn Tough crew 4.4
knee brace: generic 3.9
camp shoes: cheap foam sandals 6.3
beanie: generic wool 1.7
waterproof mittens: generic at REI 1.5
stuff sack: Sea to Summit drybag 2.1
total: 87.3 ounces
(5.46 lbs)
Water
filter: Sawyer Squeeze 3.0
dirty water bags: Sawyer collapsible (2) 2.0
shoulder bottle: Smartsolo 20 oz 1.0
water bottles: Smartsolo 1-liter (2) 2.0
water bottles: Powerade 1 liter (2) 2.0
gravity feed line to hang on tree: paracord, 5 feet 0.2
purification tablets: Portable Aqua (A and B) 2.3
total: 12.5 ounces
(0.78 lbs)
Miscellaneous
caribiner and paracord: generic 2.4
cell phone: Samsung Galaxy S24 with case 7.1
prescription glasses and case: 3.3
GPS beacon/messaging: Garmin Inreach Messenger 4.0
small wallet: generic 2.0
thermometer: Thermodrop 0.5
power: Belkin 10,000 mAh 7.5
cables and plugs: generic 5.0
lip balm: generic 0.8
sunscreen: generic 2.2
first aid/repair kit: made my own 9.0
headlamp w/batteries: Black Diamond 2.8
swiss army knife: Victorinox Huntsman 3.4
small flashlight (single AAA): Nebo 1.1
ziplock and garbage bags: generic 2.2
total: 53.3 ounces
(3.33 lbs)
Hygiene
toothbrush: generic 0.5
toothpaste: travel size 1.0
big washcloth/small towel: generic 2.1
toilet: trowel, TP, doggy poop bags 5.0
(doggy poop bags are for picking up and packing out used TP)
hand sanitizer: generic 1.4
wet wipes: 20-pack 3.4
total: 13.4 ounces
(0.84 lbs)
TOTAL BACKPACK WEIGHT: 377.8 ounces
(23.6 lbs)
Changed gear after Oracle
After crossing Mount Lemmon, I no longer worried about cold temperatures and snow, so I felt comfortable leaving some of my cold-weather gear at my friend’s house in Tucson (but you will need it again if you hike beyond Pine). I also left behind some gear I found I had not used.
left fleece (rain coat provides similar warmth) -8.7
left rain pants -10.3
changed to lighter puffy (REI 650, no hood) -3
left knee brace (hadn’t used) -3.9
left baseball cap (hadn’t used) -2.4
left sponge and camp soap (hadn’t used) -1.5
hand sanitizer (I used wet wipes instead) -1.4
Reduced weight: 31.2 ounces
(1.95 lbs)